 Radbin
The short answer: Photoshop can sharpen a photo that is slightly soft, but it can't bring back detail the camera never recorded. So match the fix to the blur. Slightly soft: Smart Sharpen or Camera Raw. Light camera shake: Smart Sharpen set to Motion Blur. Too small: Super Resolution or an AI upscaler. And when the wrong thing is sharp, or the whole subject is soft, you need a tool that redraws the focus, like Refocus in my Radbin plugin.
Full disclosure: Radbin is mine. The results below are real, from my tutorial, so you can judge them yourself.
My Refocus tutorial on YouTube, 10 minutes, five examples.
What kind of blur does your photo have?
Zoom to 100% and look for the sharpest thing in the frame. If something is sharp, the camera focused, just not where you wanted. If nothing is, look at the edges: streaks or double edges mean movement, an even softness means the whole photo missed focus, and little blocks mean it's small or heavily compressed.
| The blur | The fix in Photoshop | Its limit | With Radbin |
|---|---|---|---|
| Slightly soft everywhere | Smart Sharpen, or Camera Raw's Detail panel | Halos if you push it | Not needed |
| The wrong thing is sharp | Lens Blur can soften the rest | It can't sharpen your subject | Refocus |
| Everything out of focus | Sharpening helps a little | The detail was never recorded | Refocus, subject set to Blurred |
| Camera shake or motion | Smart Sharpen, Remove: Motion Blur | Small, straight streaks only | Not tested yet |
| Too small, pixelated | Super Resolution, Generative Upscale | An enlarged blur stays a blur | Upscale, Studio portrait |
| Heavy JPEG blocks | Neural Filters, JPEG Artifacts Removal | Fine texture softens | Not tested yet |
How do you sharpen a slightly soft photo?
Smart Sharpen is the best of Photoshop's sharpening filters, because you tell it what kind of blur to undo.
- Right-click the layer and choose Convert to Smart Object, so you can change the sharpening later.
- Choose Filter › Sharpen › Smart Sharpen and set Remove to Lens Blur.
- Start with a small Radius, about 1 pixel, raise the Amount until the edges look crisp at 100%, and add a little Reduce Noise if grain appears.
In Filter › Camera Raw Filter, the Detail panel does the same with more control: Amount and Radius, Detail for how much fine texture gets sharpened, and Masking to keep smooth areas like skin and sky out of it. Hold Option (Alt on Windows) while you drag Masking to see what it protects. The Texture slider brings out fine detail without hard edges.
Both make edges crisper. Neither adds detail that isn't there, and too much of either draws bright halos along every edge.
How do you fix motion blur or camera shake?
Older tutorials send you to Shake Reduction. Adobe removed it in Photoshop 23.3, in April 2022. What's left is Smart Sharpen:
- Choose Filter › Sharpen › Smart Sharpen and set Remove to Motion Blur.
- Set the Angle to the direction of the streaks, and raise the Amount slowly.
It helps with a small, straight streak. A long or curved one, like a shaky handheld shot at night, can't be undone this way. I haven't tested Refocus on motion blur yet, so I won't promise it.
How do you fix a photo that is too small?
A small photo looks blurry because it has too few pixels, not because it missed focus, and the fix is to upscale it. Super Resolution in Camera Raw doubles it faithfully, Generative Upscale in Photoshop 2027 goes to 4×, and Radbin's Upscale goes to 8× with Ultra, from 1 credit. A face gets its own tool, Studio portrait, which draws the portrait again at 4K. Every way, compared: how to upscale an image in Photoshop.
Can you change the focus after the photo was taken?
Not in Photoshop alone. Its focus tools, like Lens Blur in Camera Raw, only add blur around a point you choose; Adobe's own note says they work "only if the original image isn't blurry". They can make a sharp background soft. They can't make a soft subject sharp.
Refocus, in Radbin, moves the focus to whatever you pick, with the blur growing with distance as it would through a real lens. Watch (0:37)
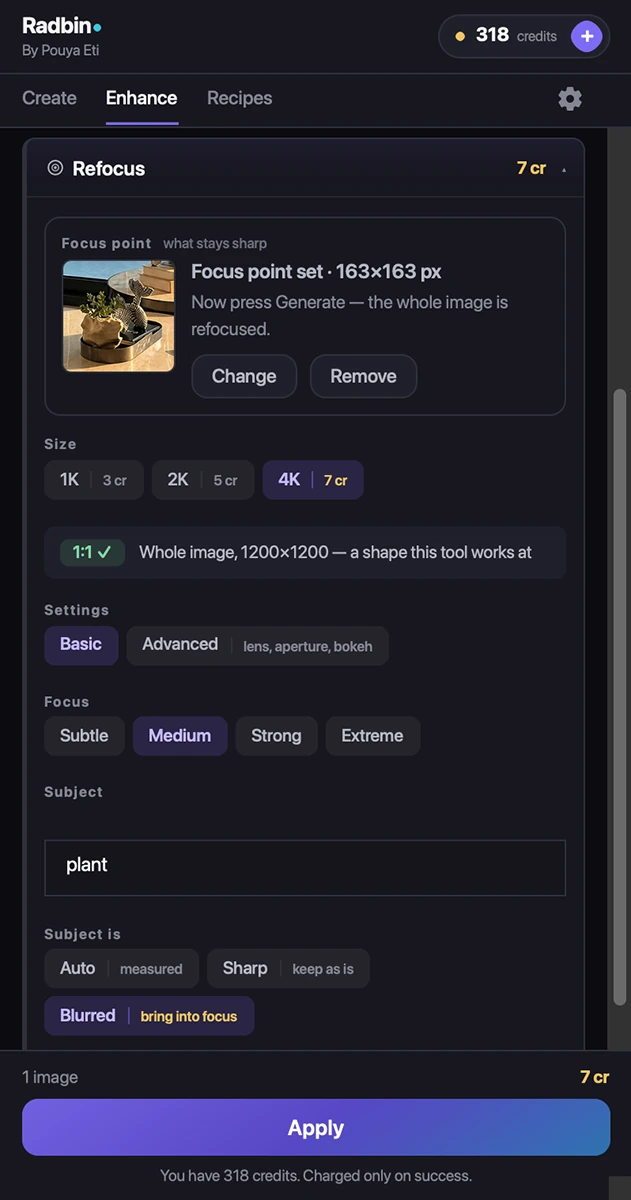
- Draw a rectangle around what should be sharp. In the Radbin panel, open Enhance › Refocus and set your selection as the focus point.
- Check the shape. Refocus works in 1:1, 4:3, 3:4, 16:9, 9:16, 2:3 and 3:2. For other shapes it uses the largest centred area of the nearest one, and the panel tells you first what it leaves out. Watch (1:20)
- Pick Basic, with four strengths from Subtle to Extreme, or Advanced: a 35, 50, 85 or 135 mm lens, macro or tilt-shift, an aperture from f/1.2 to f/16, six bokeh shapes, and blur behind the subject only or in front of it too.
- Name the subject, for example mug, and say whether it's Sharp or Blurred in the photo, or leave it on Auto to have it measured.
- Pick the size, 1K, 2K or 4K, for 3, 5 or 7 credits, and click Apply. Mine took about a minute, and the result landed as a new layer. Watch (3:21)



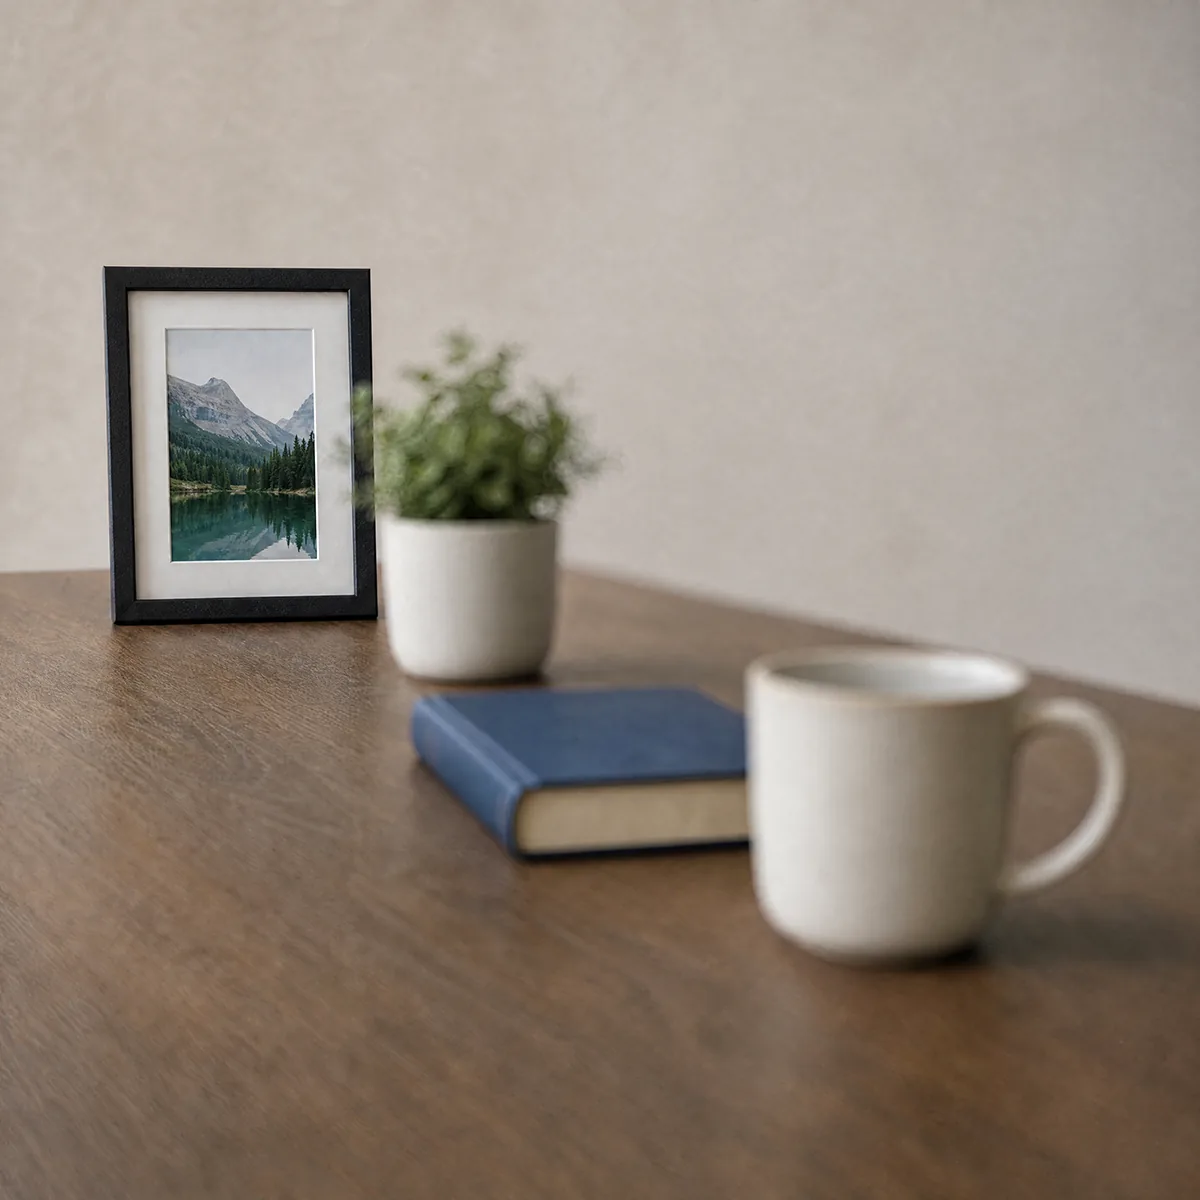
One photo, four focus points. Everything at the same distance as the subject stays sharp, and the rest falls away the way it would through a real lens. A subject that is already sharp keeps its own pixels: by default they're pasted back through an exact mask, so only the focus around it changes. Watch (3:58)
What if the whole photo, or the face, is out of focus?
Set the subject to Blurred, and Refocus rebuilds it sharp instead of keeping its pixels. In my tutorial it rescued a photo that was soft from edge to edge, and it rebuilt a person who was impossible to make out. Watch (5:25)
Be honest with yourself about faces, though. When the original holds no detail, the face is drawn again, so it comes back close but not always exact. As I said in the video, "maybe the face of the person is not 100% accurate, because we didn't have the face of the person here". For a soft portrait, Studio portrait is built to keep the face first: see four examples.
Why can't Gaussian Blur fake it?
The old trick is to select the subject and blur the background with Gaussian Blur. It looks fake for two reasons. A real lens blurs things more the further they are from the focus point, while Gaussian Blur blurs everything the same. And small bright lights in a real background turn into round bokeh, while Gaussian Blur turns them into gray smudges. Watch (7:46)
How do you avoid blurry photos next time?
- Use a faster shutter speed. A safe rule handheld is at least 1 over the focal length: 1/100 of a second at 100 mm.
- Put the focus point on the eye, or turn on your camera's eye detection, for portraits.
- Close the aperture a little for groups, so people at different distances all stay sharp.
- Zoom in on the camera's screen after an important shot. At full view, almost every photo looks sharp.
Move the focus of any photo, inside Photoshop
Refocus is on Radbin's Enhance tab, next to 14 other tools and twelve image models. From 3 credits, and a failed job refunds itself.
Watch Radbin on YouTube
Real tests and tutorials, inside Photoshop and Premiere. See the whole channel.
 21:44Photoshop 2027 new features vs Radbin
 19:57Claude Opus 5.5 edits my video in Premiere Pro
 16:20GPT Image 2.6 in Photoshop: images, vectors and GIFs
 7:37Upscale a low res portrait to 4K in Photoshop
 19:25Relight any photo in Photoshop with AI
 20:03Nano Banana 2.1 vs GPT Image 2 and FLUX 3: ten tests
 14:31Photoshop Relight vs Radbin Lightsmith
 10:24Retouch skin without losing the texture
 9:28Every Radbin tool in 9 minutes
 1:43Radbin changes only what you ask