 Radbin
The short answer: put the camera clip on the track above the screen recording, then shrink it with Scale and move it to a corner with Position in Effect Controls, or drop a ready-made PiP 25% preset on it. For a round bubble, draw an Ellipse mask while holding Shift and feather it a little. Sync the two recordings first with Clip › Synchronize by their sound.
Full disclosure: I make Radbin for Premiere, which lays out face and screen for you, and I say where it fits. Adobe renamed Premiere Pro to Adobe Premiere in January 2026; I use both names.
The Studio and its layouts in my Premiere video, from 7:56.
What should you record before you edit?
Premiere doesn't record your screen or your webcam, so record them in another app, as two separate files: OBS Studio is free and does both. Then:
- Record the screen at 4K if you can, and make the app you're showing bigger (110 to 125%), so text stays readable and you can zoom in later.
- Clap once at the start, so both recordings have the same sharp sound to sync on.
- Keep the cursor still when you're not using it, at its normal size.
How do you sync your face cam and screen recording?
- Put both clips on the timeline, one above the other, and select them.
- Choose Clip › Synchronize and pick the audio option. Premiere slides them into line by their sound.
For more than two sources, Clip › Create Multi-Camera Source Sequence can sync by Audio too. Avoid merging the clips if you might need to sync them again: merged clips can't be re-synced.
How do you do picture in picture in Premiere Pro?
- Put the screen recording on V1 and the camera on V2, above it.
- Select the camera clip, and in Effect Controls › Motion lower Scale to about 25 to 35%.
- Move it into a corner with Position, away from what you're teaching.
The quick way: Effects › Presets › PiPs has a PiP 25% preset for each corner. Drag one onto the camera clip and fine-tune it. A face about 15 to 20% of the frame's width is visible without covering the work.
How do you make a round face cam?
- Select the camera clip and pick the Ellipse Mask tool (press and hold the masking tools in the toolbar).
- Hold Shift and drag over your face for a perfect circle.
- Raise Mask Feather a little for a soft edge, or keep it at 0 for a crisp one.
Masks can't be saved as presets, but you can copy one and paste it onto other clips. For a rounded rectangle instead of a circle, the Rounded Crop effect that comes with Premiere does it in one step.
How do you add a border and a shadow?
The Stroke effect outlines the clip's rectangle, not your round mask, so for a ring around a bubble, put a slightly larger coloured circle (a shape layer) on the track under the bubble. A Drop Shadow on a masked clip can be cut off by the mask; if it is, nest the masked clip first and add the shadow to the nest.
When should your face fill the screen, and when the screen?
Showing your face helps. In a study of 6.9 million viewing sessions on edX, videos that mixed a talking head with slides held viewers better than slides alone (Guo, Kim and Rubin, 2014). The rules I use, and gave Claude in my plugin:
- Your face, full frame, for the hook, opinions, stories, the summary and the call to action.
- The screen with your bubble when something happens on it, or your words point at it: "click", "here".
- The screen alone for dense work, where your face would only get in the way.
- Let shots breathe: most last 10 to 40 seconds, and none under 3.
How do you switch layouts through a whole tutorial?
By hand, you keyframe Scale and Position at every change, or cut between nested layouts. In Radbin for Premiere, Claude chooses a layout for each part of your talk, and you change any of them in its Studio. Watch (7:56)
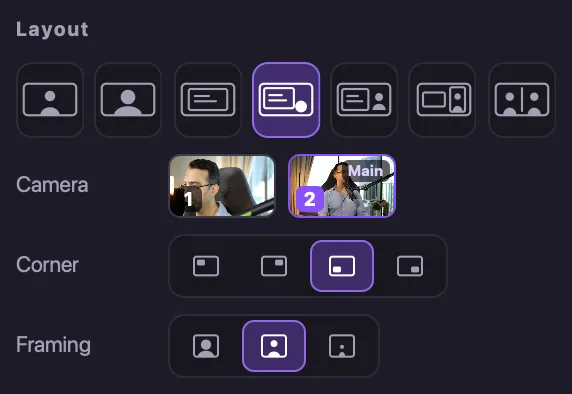
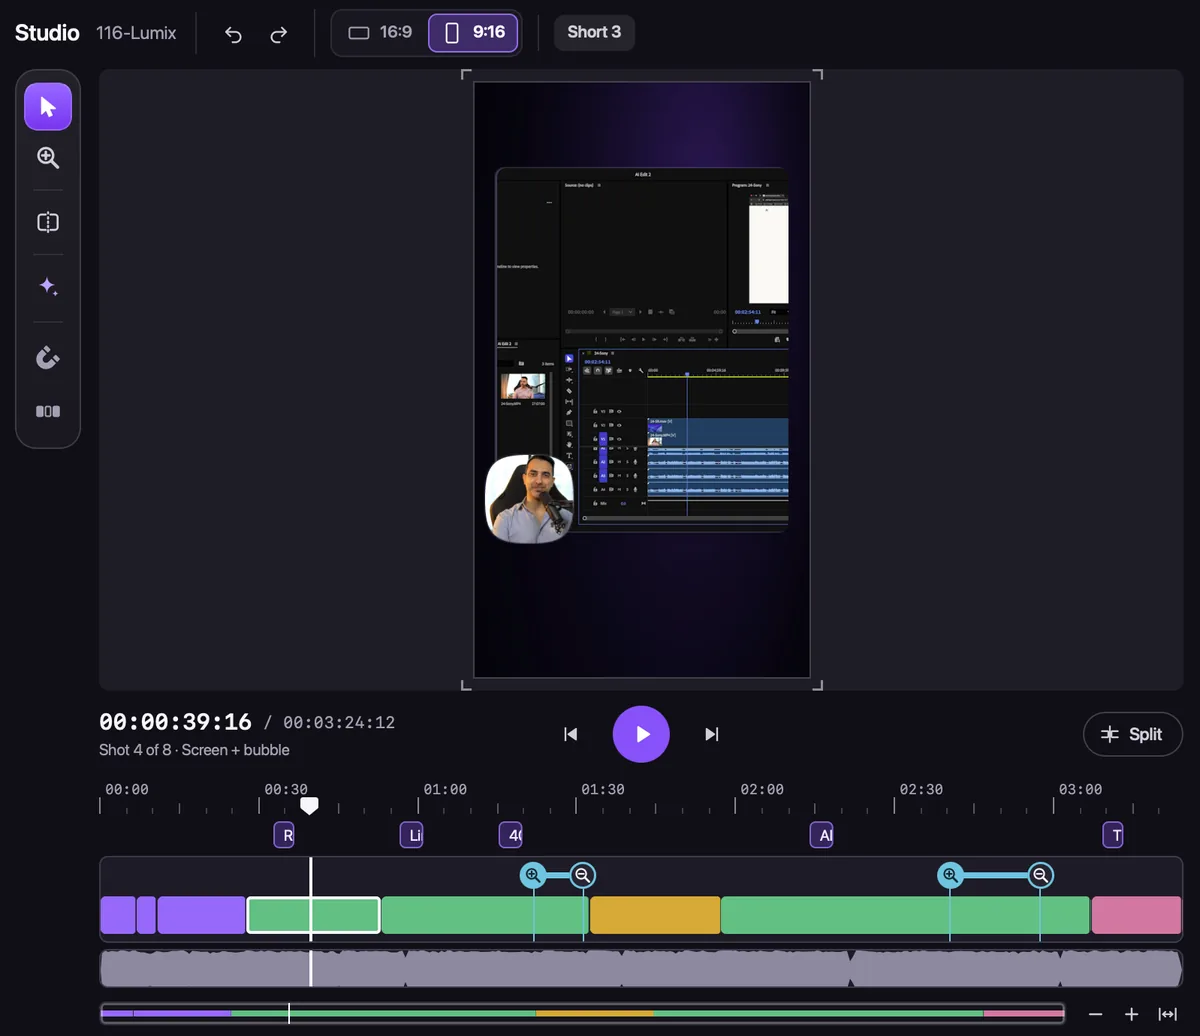
- Seven layouts: Speaker, Speaker closer, Screen, Screen and bubble, Side by side, Presenter, and Both cameras.
- For each shot: the camera, the corner, the framing (close, medium or wide), which side you're on, and all of the screen or just a part of it. "I want to move myself to the left side, which we have more empty space." Watch (9:46)
- For every shot at once: Clean, edge to edge with you in a rounded bubble, or Studio, on cards over a background; a border, the bubble's shape and size, and the transitions. "Click on clean and it will affect all of your shots." Watch (9:58)
- A bubble that moves out of the way: it goes to the bottom right, unless the screen is busy there, so it doesn't cover what you're showing.
Every shot shows why Claude chose it, and your original sequence stays as it was. A full edit costs about 4 credits a minute, and you start with 40 free: how Claude edits video inside Premiere.
Which tools do this for you?
| Tool | What it is | Platform | Price |
|---|---|---|---|
| Premiere by hand | Masks, presets and keyframes | Mac, Windows | In your plan |
| OBS Studio | A free recorder; you build the layout live | Mac, Windows, Linux | Free |
| Camtasia | Records camera and screen as separate layers, edits them | Mac, Windows | From $179.88 a year |
| Screen Studio | A recorder with automatic polish | Mac | $9 a month, yearly |
| Loom | Quick recordings with your face | Mac, Windows, phone | Free Starter, then $18 a month |
| Tella | Recorder and editor for tutorials | Mac, Windows | From $13 a month, yearly |
| Descript | Records and edits by text | Mac, Windows | From $16 a month, yearly |
| Radbin for Premiere (mine) | Lays out face and screen inside Premiere | Premiere 26.3 or newer | 40 credits free, then from $9.97 a month |
Prices from each tool's own page on 17 November 2026. If you already record in OBS and edit in Premiere, you don't need another app: the Premiere steps above, or a plugin, cover it. To make the screen easier to read, zoom in where it matters: how to zoom in on a screen recording in Premiere Pro.
Every shot laid out for you, inside Premiere Pro
Radbin for Premiere lays out your camera and screen in seven layouts, shot by shot, with a bubble that moves away from the busy corner. Your first 40 credits are free.
Watch Radbin on YouTube
Real tests and tutorials, inside Photoshop and Premiere. See the whole channel.
 21:44Photoshop 2027 new features vs Radbin
 16:20GPT Image 2.6 in Photoshop: images, vectors and GIFs
 7:37Upscale a low res portrait to 4K in Photoshop
 19:25Relight any photo in Photoshop with AI
 20:03Nano Banana 2.1 vs GPT Image 2 and FLUX 3: ten tests
 14:31Photoshop Relight vs Radbin Lightsmith
 10:24Retouch skin without losing the texture
 9:28Every Radbin tool in 9 minutes
 9:50Fix the focus of any photo after it was taken
 1:43Radbin changes only what you ask